Tired of generic discounts that don’t convert? The WooCommerce Discounts Manager plugin offers a powerful arsenal of tools to create targeted, engaging offers that drive sales and boost customer loyalty.
In this guide, we’ll delve into the intricacies of creating various discounts within WooCommerce, helping you maximize your store’s potential.
Creating Diverse Discount Strategies
WooCommerce empowers you to create a variety of discounts to suit your marketing goals:
- Buy X Products for Fixed Amount: Offer a fixed price for purchasing a specific quantity of products.
- Buy X Products for Y Discount: Provide a discount (percentage or fixed amount) when customers buy a certain quantity.
- Bulk Pricing: Offer tiered discounts for different order quantities, encouraging larger purchases.
- Surcharge Specific Customer Roles: Apply additional charges to specific customer groups (e.g., non-logged-in users).
Now let’s discuss how to create discounts using WooCommerce Discount Manager.
Accessing the Discounts Manager
The first step is to navigate to your WooCommerce dashboard. From there, locate the “Discounts Manager” under the “WooCommerce” settings. This is the central hub for managing all your discount-related configurations.
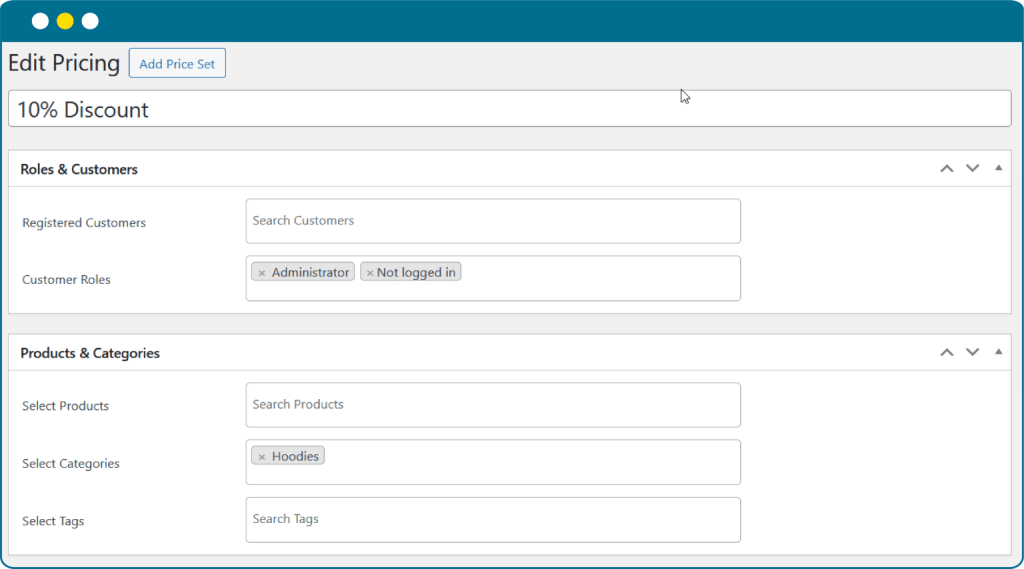
Discount Title
Give your discount a descriptive name. This will be visible in your WordPress admin area, helping you identify discounts in the main list and on individual order pages
Target Your Discounts
Select who you want to apply discount for
- Registered Customers: You can select specific registered customers from the list for discounts.
- Customer Role: You can select specific customer roles from the list for discounts.
Apply Discounts to
- Select Products: Choose individual products to apply discounts to.
- Select Categories: Apply discounts to entire product categories.
- Select Tags: Target products based on specific tags or attributes.
Schedule Discounts
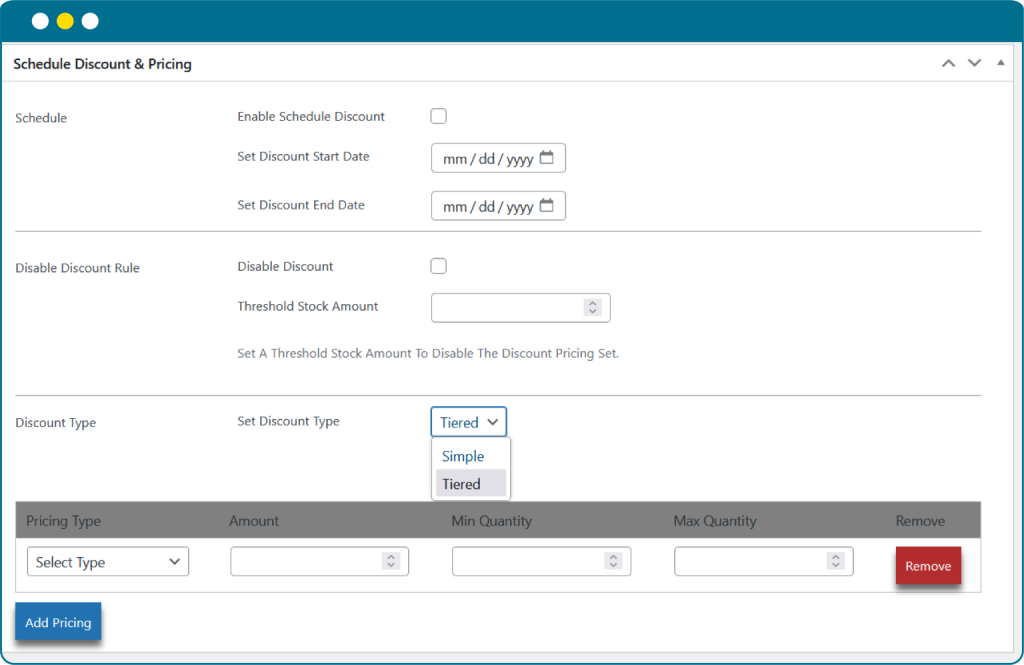
Set specific start and end dates for your discounts to automatically activate and deactivate.
Set Stock Threshold
Automatically disable discounts when product stock falls below a predetermined level.
Simple Discount
- Fixed: Apply a fixed amount to the product price.
- Percentage: Offer a percentage discount on the product price.
Tiered Pricing
- Fixed Increase: Add a fixed amount to the product price for specific quantity ranges.
- Fixed Decrease: Reduce the product price by a fixed amount for specific quantity ranges.
- Percentage Increase: Increase the product price by a percentage for specific quantity ranges.
- Percentage Decrease: Decrease the product price by a percentage for specific quantity ranges.
Set Quantity Ranges
- Minimum and Maximum Quantity: Specify the minimum and maximum quantities required to qualify for the discount.
Choosing the Right Pricing Basis for Discounts
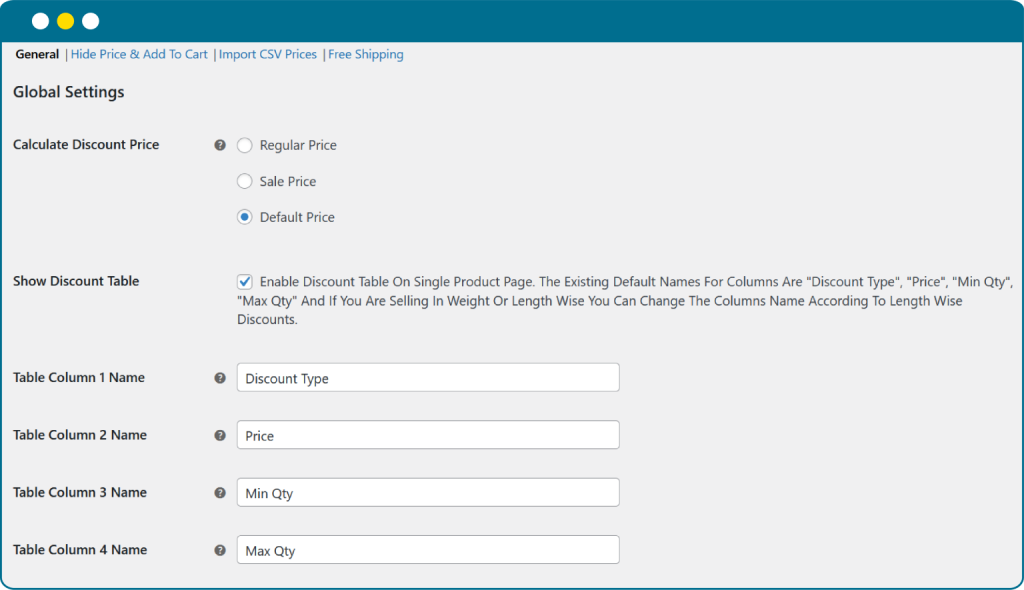
- Regular Price: Discounts are applied to the original, non-discounted price of the product.
- Sale Price: Discounts are applied to the discounted sale price of the product.
- Default Price: Discounts are applied to the base price of the product, regardless of whether a sale is active.
Display Discount Tables on Product Pages
To enhance product page transparency and encourage purchases, WooCommerce Discounts Manager enables the display of discount tables. These tables provide customers with clear information about available discounts.
Tailoring Visibility: Hiding Prices and Add to Cart Buttons
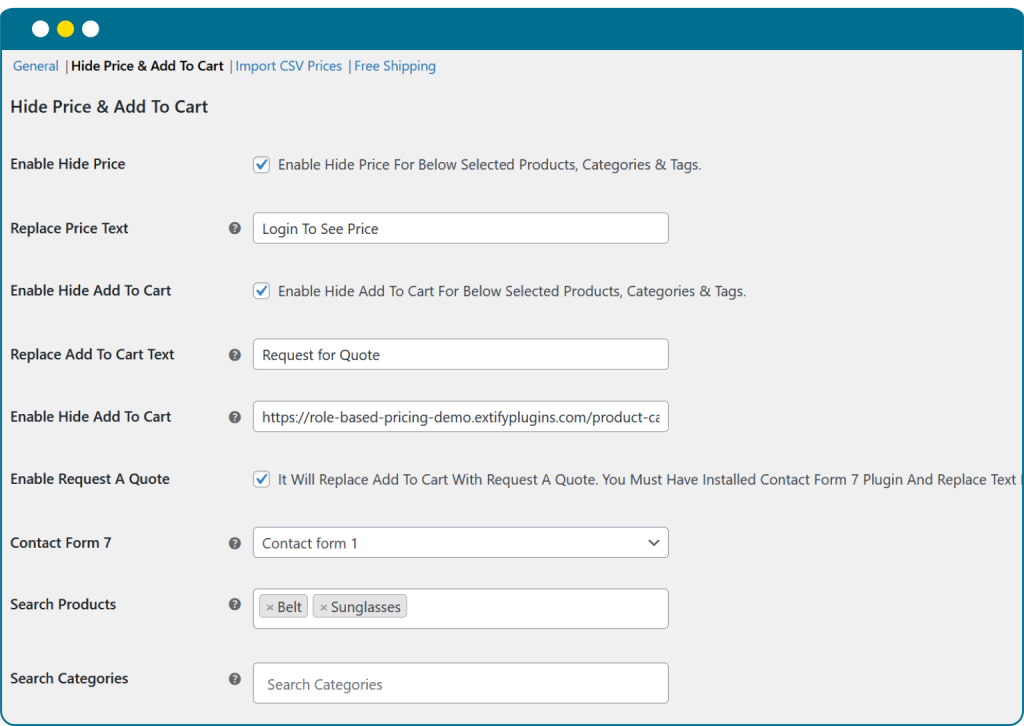
To create a sense of urgency or exclusivity, consider hiding prices or the “Add to Cart” button and replace it with “Request for Quote: button for certain products or customer segments. This can encourage immediate inquiries about custom prices and order in bulk
- Hide Price: Conceal the price for specific products, categories, or customer groups.
- Replace Price Text: Customize the text that replaces the hidden price (e.g., “Contact for Pricing”).
- Hide Add to Cart: Prevent customers from adding specific products or categories to their cart.
- Replace Add to Cart Text: Change the text displayed on the add-to-cart button (e.g., “Learn More”).
- Redirect Customers: Direct customers to a specific page instead of the cart (e.g., a contact form).
- Request a Quote: Allow customers to request a quote for products that require customization or special pricing.
Streamlining Pricing with CSV Imports
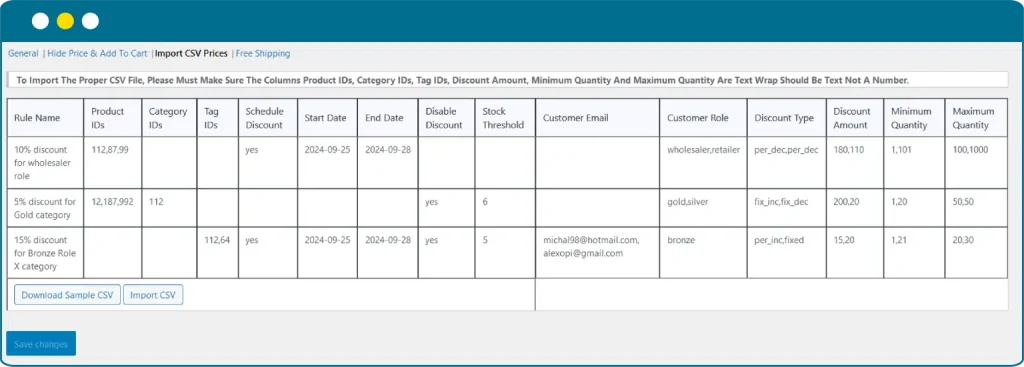
For bulk pricing adjustments, importing CSV files is a time-saving approach.
- Navigate: Go to WooCommerce > Settings > Role Based Prices > Import CSV Prices.
- Upload CSV: Prepare a CSV file containing price set titles, product/category IDs, tag IDs, customer roles, customer emails, discount types, amounts, and quantity ranges.
- Import: Upload the CSV file to quickly implement multiple pricing rules.
Incentivizing Purchases with Free Shipping
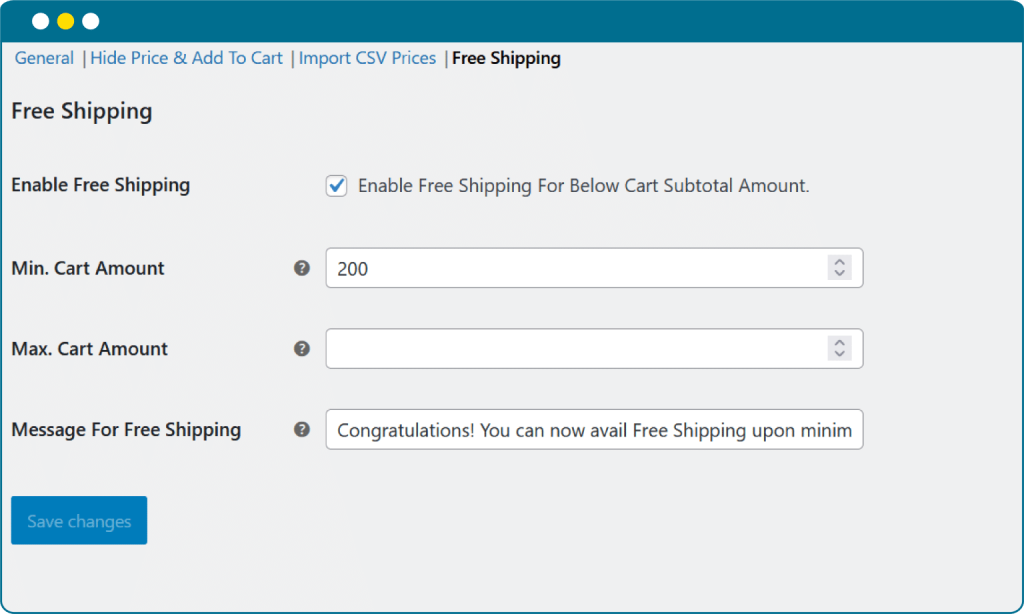
Offering free shipping can significantly boost average order values and encourage repeat purchases.
- Navigate: Go to WooCommerce > Settings > Role Based Prices > Offer Free Shipping.
- Activate: Enable the free shipping feature.
- Set Minimum and Maximum: Define the minimum and maximum purchase amount required to qualify for free shipping.
- Customize Message: Personalize the message that appears when customers meet the free shipping criteria.
Conclusion
By effectively utilizing WooCommerce’s Discounts Manager, you can create compelling offers that drive sales, enhance customer satisfaction, and foster loyalty. Experiment with different discount strategies to find what works best for your business and target audience.


